Help
Using Hermes Web Messenger
Log On to Hermes Web Messenger
To log on to the Hermes Web Messenger:
-
Click the 'Log On' link as shown below.

-
Enter your Hermes user details.

- Press the 'Log On' button.
Where to Find Hermes Data
Hermes Web Messenger has a main menu-like navigation bar for browsing the pages of Hermes data.

Each item is explained below.
Home
The Hermes Web Messenger 'Home' page shows a summary of the Hermes Server's activity. It shows a summary of the user's 'Inbox', 'Downlinks' and, if the current user is an Administrator, 'Administrative Events'.
The Home page also shows the last time the Hermes Server was active, i.e. the latest timestamp of the Hermes Server's health count.
Fleet
This page contains a view of the aircraft a user has been given permission to see. Columns of interest can be sorted and grouped depending on a user's needs (see Working with Message/Aircraft Grids). A user may also send an uplink to an aircraft, or multiple aircraft.

Clicking an individual aircraft's flight number or registration shows the aircraft details page for that aircraft.
Aircraft Details
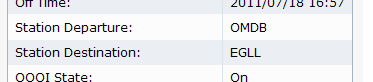
An aircraft details page contains aircraft properties and recent message traffic to and from that aircraft.
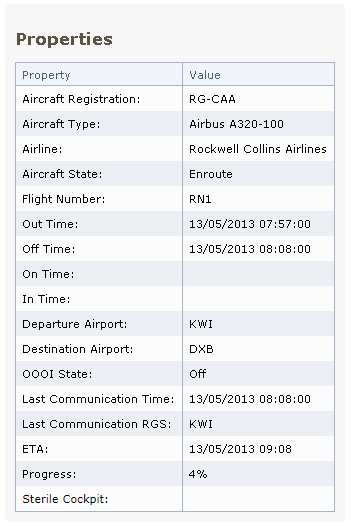
It is also possible to send an uplink to the aircraft using the 'Send Message to Aircraft' button. Alternatively, a message may be sent in response to an existing message, using the 'New Message to' button or 'Forward' button (if present).
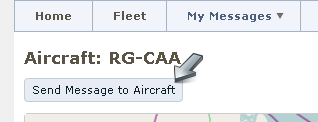
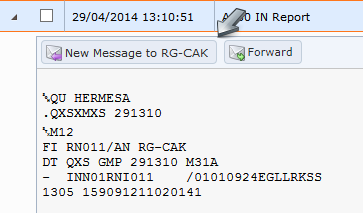
Using either method will create a New Message.
My Messages
The 'My Messages' menu item has further options depending on a user's permissions and contains messages relating to this user:
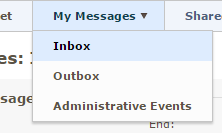
- Inbox - the current user's messages.
- Outbox - messages this user has sent, e.g. to an aircraft or another user.
- Administrative Events - if this user has the correct permission, this shows Administrative Event messages from the Hermes Server. A user that does not have permission to read Administrative Events will not be shown this menu item.
Reply To User Message
Messages from other users may be replied to by clicking the 'Reply to' button. This will create a New Message.

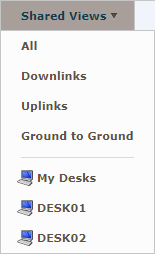
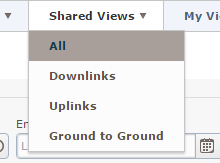
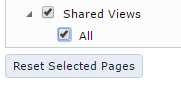
Shared Views
The Shared Views item provides a set of centrally controlled, common useful filters (views). Users can also select views for any desks they are assigned to from the Shared Views menu. The following views are supplied as defaults - though these may have been added to, altered or removed by the local administrator (with the exception of the ‘All’ view);

- Downlinks - a view filtered on 'Downlink' message type, showing all messages from aircraft.
- Uplinks - all messages to aircraft, this view is filtered on 'Uplink'.
- Ground to Ground - messages to and from ground systems and Hermes users, i.e. messages that are not identified by the Hermes Server as Downlinks or Uplinks. This view is filtered to 'In' and 'Out' message types.
- All - shows all of the above messages on one page.
Shared Views, together with access permissions, are defined centrally. Each time a user logs in, adjustments they may have made to filters, columns, groupings etc., will have been reset back to the centrally controlled default. If a user wishes to retain their personal adjustments, without the impact of automatic resets upon login, they should create themselves a Custom View.
Desks
If a user has been assigned to any desks, they will see a "My Desks" option under the Shared Views menu. This shows messages relating to all of the desks to which they have been assigned. If a user is assigned to multiple desks they will also see a menu option for each desk they are assigned to, which will show messages just for that desk.
User Menu
The 'User' menu (showing the currently logged on user) allows the user to:
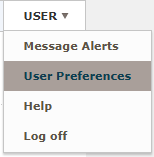
- User Preferences - view and change User Preferences.
- Help - view this help page.
- Log off - thus ending the user's Hermes Web Messenger session.
Search
Search allows a user to find available messages that contain specific text in the message body.


Search features are not available to all users. Contact your administrator if search is required.
There are two search features:
- 'New search' that allows the user to search all available messages, without any other filters/input.
- 'Filter' search, which uses the start/end dates and current grid filters in addition to the search term entered.
Working with Hermes Message/Aircraft Data
Filtering Data
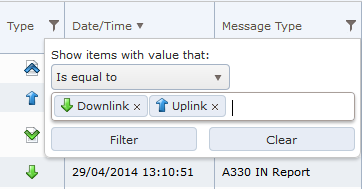
Tables and grids showing Hermes data can be filtered. Click the filter icon as shown below. Nearly all data can be filtered.
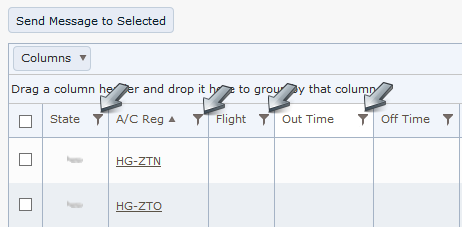
Clicking the icon shows the filter selection.
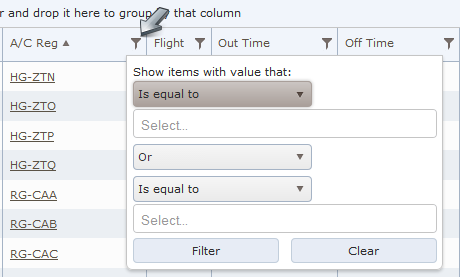
Some columns will allow filtering on "equal to [EMPTY]". This can be used to find rows that do not have a value in that column. You can also do "not equal to [EMPTY]" to only show rows that have a value.
To add an aircraft registration filter, for example:
-
Click the filter icon.
-
Enter 'RG-CAA' and 'RG-CAB' as the filter value.
-
Click 'Filter'.
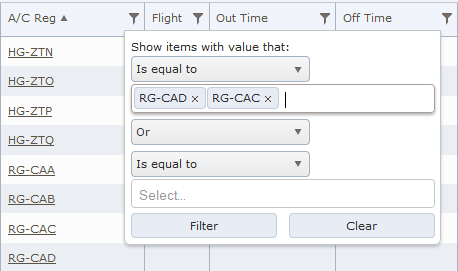
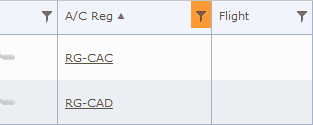
The grid will only show data relating to the aircraft 'RG-CAA' or 'RG-CAB'. Other filter operators, combined with adding a second filter term, can be used to create flexible filtering criteria. Note the column menu icon changes to show the column is filtered.
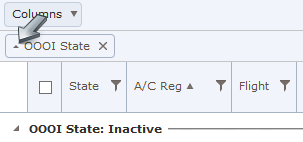
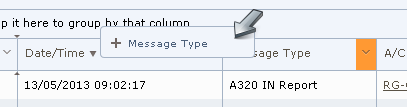
Grouping Data
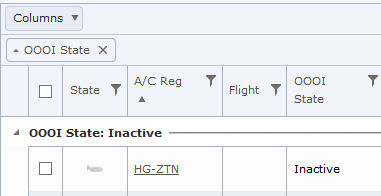
Tables and grids showing Hermes data can be grouped.
-
Click and drag a column header to the group area.
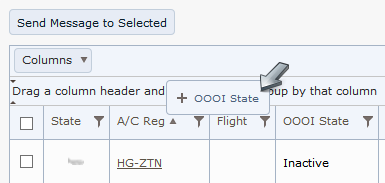
-
Drop the column header by releasing the mouse button.
Sorting Data
Hermes data can be sorted into ascending or descending order.
-
Click the target column header to change the sort order.
-
Click the target column header again to alter the sort order.
Grouped data may also be sorted by clicking the grouped item:
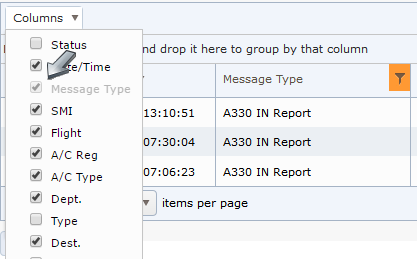
Choosing Columns
Columns can be hidden or shown on the Fleet and Message grids. To hide (or show) columns:
-
Open the column menu.
-
Select the columns shown (a check indicates a column is shown).
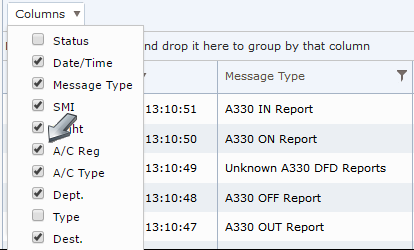
The Hermes Web Messenger will not hide filtered columns (indicated by the checkbox being disabled).
Moving Columns/Column Order
Grid columns may also be rearranged in the Hermes Web Messenger. To rearrange columns:
-
Click and drag a column header to its new location.
-
Release the mouse button when the column is in the desired place.
Resize Columns
Grid columns may be resized. To resize a column:
-
Click and drag a column's edge.
-
Stop dragging when the column is the desired size.

Browsing Messages
Date Filters
Message pages are filtered by a date range; that is, messages shown on a page fall between the dates shown (inclusive).

-
Start Date - indicates the start date.
-
End Date - indicates the end date. No end date (i.e. Live traffic) indicates that Hermes Web Messenger will read the latest messages.
Viewing Messages
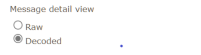
Web Messenger can display the raw ACARS message or a decoded view showing message fields in a table format

The default message view can be configured on the User Preferences page
To display the ACARS message as received by Hermes select the Raw view, to display the decoded detail view, select Decoded.
Message View Toggle
Once a message is expanded it is possible to switch between Raw and Decoded views. If the toggle is on the left, this means that the message will be shown according to the default view. Sliding the toggle to the right will switch to the other view (as indicated by the label next to the toggle).
Toggle when preference is Decoded:
Toggle when preference is Raw:
Decoded Message View
When a message is shown in Decoded view, the standard decoded fields are shown on the left side, followed by any custom decoded fields for that message type. The Freetext is shown on the right side.
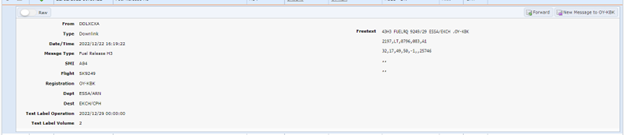
When a message is not valid uplink or downlink the Freetext is replaced with Message body.

Raw Message View
When a message is shown in Raw view, the raw message, as received by Hermes Server, is shown.

Printing Messages
To print messages:
-
Select the messages for printing (the messages will be printed in the order shown, so also apply a column sort if needed).
-
Choose "Print Selected" from the selection menu.

-
Choose whether to "Include Message Bodies" on the print page.
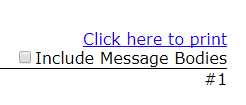
-
Click on "Click here to print" (which launches the browser's print dialog).
-
Use the browser's back button to return.
Downloading Messages as CSV
The capability to download messages as a CSV file is restricted by the 'Export Messages' permission; users without this permission will not see the menu option.
-
Select the desired columns and sort order, as these will be applied to the resulting CSV.
-
Select the messages for downloading.
If no messages are selected this option will download all the messages that match the filters (limited to 100,000 results), not just those shown on the current page.
-
Choose "Download selected as CSV" from the selection menu (or "Download results as CSV" if no messages are selected).
-
Choose whether to "Include Message Bodies" on the confirmation dialog. Unless the message bodies are required in the export it is recommended not to include the message bodies as this will increase the file size and could make the download take longer.
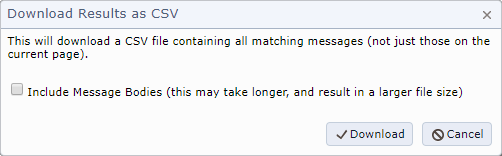
-
Click on "Download"
-
The messages will then be downloaded as a CSV file.
Downloading Messages as a zip file
The capability to download messages as a zip file is restricted by the 'Export Messages' permission; users without this permission will not see the menu option.
-
Select the desired column groupings and sort order, as these will be applied to the resulting zip file. Groupings result in folders within the zip file.
-
Select the messages for downloading.
If no messages are selected this option will download all the messages that match the filters (limited to 100,000 results), not just those shown on the current page.
-
Choose "Download selected as zip" from the selection menu (or "Download results as zip" if no messages are selected).
-
If no messages are selected and there is more than one page of data a confirmation prompt will be shown.
-
The messages will then be downloaded as a zip file.

Each message will be represented as a text file within the message, with the message body being the content. The filename will be an incrementing number (to give the desired sort order), followed by the Message Type.
If a grouping was applied this will result in folders within the zip file, with the message numbering being local to each file.
Marking Messages as read
If a message page has a read/unread status (e.g. Inbox) it is possible to mark all the messages on the page as 'read'.
-
Choose the "Select all messages on page" from the selection menu.
-
Choose the "Mark selected as read" from the selection menu.
Deleting Messages
Messages can be deleted from a user's Inbox or Administrative Events page (for Admin users).
-
Select the messages for deleting.
If no messages are selected this option will delete all the inbox/administrative messages for that user, ignoring the filters and current page.
-
Choose "Delete selected" from the selection menu (or "Delete all" if no messages are selected).
-
Choose "Yes" when prompted to confirm the deletion.
Take Ownership
Messages can be owned by different users. A user becomes the owner of a message by pressing the "Take Ownership" button.

On pressing the Take Ownership button, the latest owner status will be loaded and a message confirmation dialog box will be displayed if the message is already assigned to an owner.
Note: The Take Ownership button will be disabled when attempting to take ownership of a message already assigned to the current user.
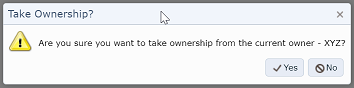
The confirmation message with the previous owner name will be displayed when taking ownership of a message with a current owner.
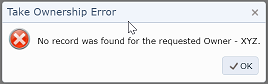
An error message will be displayed if the previous owner has changed since the confirmation prompt was shown.
Remove Ownership
The "Remove Ownership" button can be used to reset the user ownership.

On pressing the Remove Ownership button, the latest owner status will be loaded and a message confirmation dialog box will be displayed if the message is owned by another user.

An error message will be displayed if the previous owner has changed since the confirmation prompt was shown.
Mark Message Done
Messages can be marked as done using the below toggle. When a messaage is marked as done other users cannot take ownership.

If a message is unowned when the 'Done' toggle is clicked ownership will also be taken.
A message marked as done can be changed back to not done by clicking the toggle. Note that Ownership will not be removed.
Auto-Refresh
The auto-refresh setting present on message pages will, when selected, auto-refresh the page every sixty seconds.

Auto-refresh is turned off when browsing through older messages, i.e. those on page two and beyond, or when there is an end date specified.
Custom Views
Hermes Web Messenger allows the user to save a snapshot of the current message page with filters, visible columns, sort order (and so on) applied; this creates a Custom View. A custom view can be returned to via the navigation menu item 'My Views' that is shown if a user has any custom view pages.
Custom views are user-specific and stored with the user's profile.
Create a Custom View
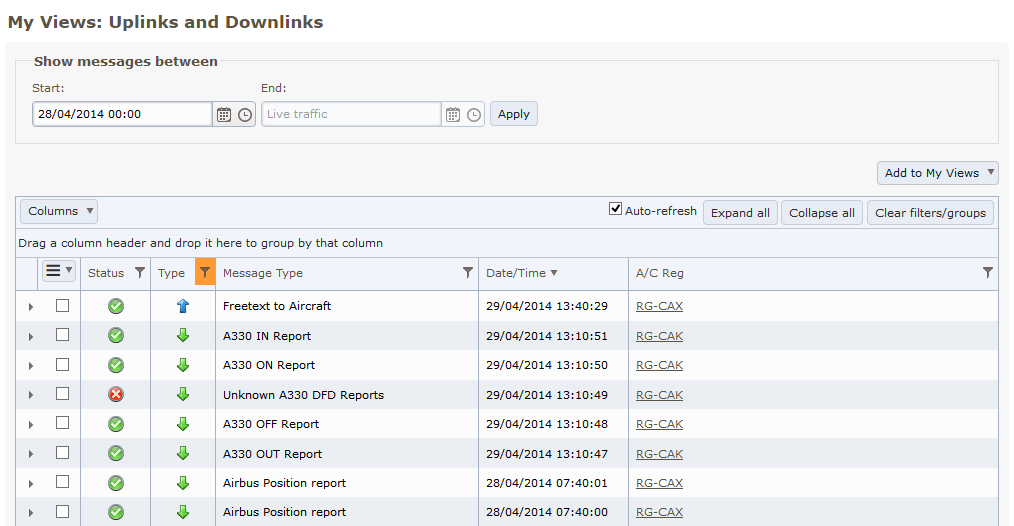
This example creates an uplinks/downlinks view from the Shared Views 'All' page.
-
Browse to any message page (e.g. 'All').
-
Filter Type on Downlink or Uplink
-
Remove SMI, Flight, A/C Type, Dept, Dest and To columns by unchecking the appropriate checkboxes.
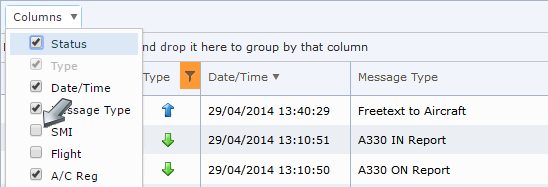
-
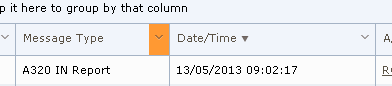
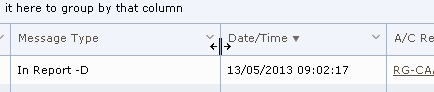
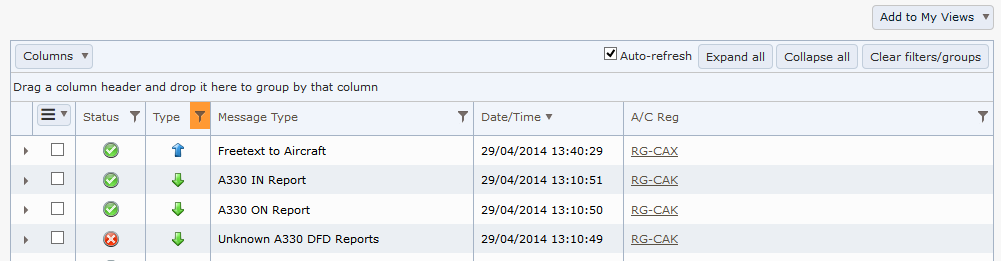
Move the Message Type column header to the left of the Date/Time column. The view should look like:
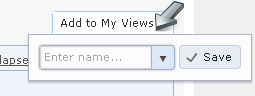
The view looks good, time to add it to 'My Views'.
-
Click 'Add to My Views':
-
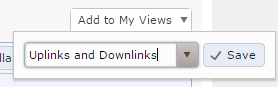
Type in a name, e.g. 'Uplinks and Downlinks':
-
Press the save button.
Hermes Web Messenger will save the custom view.
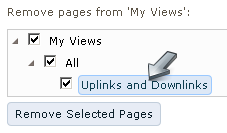
My Views
Hermes Web Messenger provides a menu option that allows a user to navigate to their custom views:

Update a Custom View
The Hermes Web Messenger automatically updates a grid when it changes, e.g. column order or filter settings. However, a custom view is not updated in the same way. A user must manually 'Save' the custom view.
-
Browse to a custom view.
-
Make changes to the view (e.g. alter the sort order).
-
Click 'Add to My Views'. Note that the Hermes Web Messenger has already given this view a name.
-
Click the save button. You will be prompted to overwrite the existing view.
-
Click 'Yes' to save the updated view.
Hermes Web Messenger will save the updated view.
Remove a Custom View
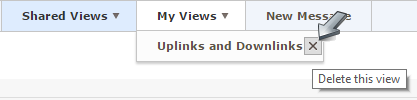
Deleting a custom view is achieved by clicking on the x button next to the custom view name in the 'My Views' menu.
Deleting multiple custom views in one operation is achieved via View Management.
TopNotifications and Alerts
There are two ways that Hermes Web Messenger can be configured to draw attention to new messages. Both are configured in User Preferences.
Notifications apply to new messages for the page currently being viewed.
Alerts are configured for specific messages, and are applicable to whichever Web Messenger page is being viewed.
Notifications
message notifications alert the user to new messages for the page they're currently viewing in three ways.
-
A notification banner will be shown if Auto Refresh is turned off for the current page.

-
A desktop notification will be shown if the webpage is in the background or not visible (if allowed and supported by the browser).
- A sound will play for matching messages if configured and allowed by the browser.
Alerts
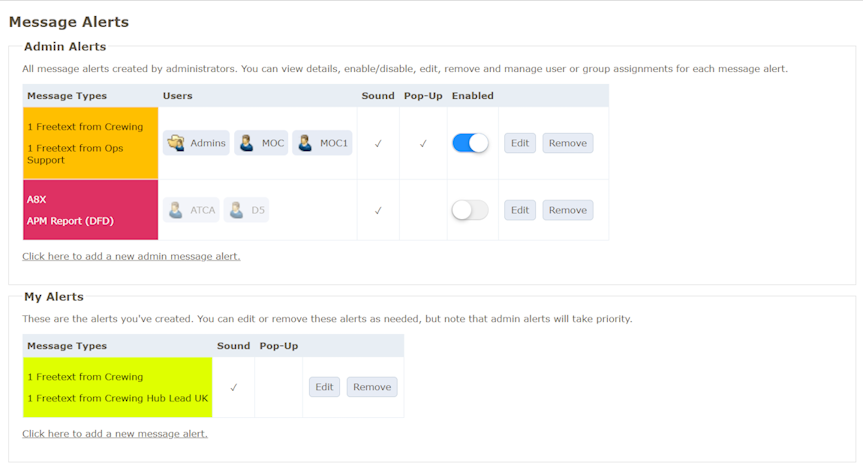
Message Alerts can be either Admin Alerts or My Alerts, which can both be configured on the Message Alerts page. Note that an Admin Alert takes higher priority than My Alert.
Message Alerts have three options:
-
Background Colour - A custom background colour to use for alerted messages.
-
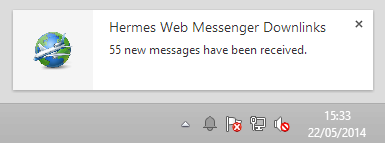
Popup Message - A browser popup window is shown (regardless of which Web Messenger Page is being viewed).
The popup is shown whenever one or more new messages are received that are configured to show a Popup. The popup does not indicate how many, or what types of message have been received, to find this out you will need to navigate to a suitable messages page.

- Sound Notification - Plays a sound whenever one or more new messages are received that are configured to play a sound.
The check for new alerted messages happens on each page navigation, and every 60 seconds afterwards (by default). Each check involves looking for one or more new messages (since the last check) that have a popup/sound alert configured. Only one sound alert will be played per alert check (rather than a sound per alerted message).
Configure Message Alerts
By configuring Message Alerts for specific message types you can be alerted (in various ways) when new messages of these types are received (see Alerts for more info).
Add a My Alert
To add a new My Alert click the "Click here to add a new message alert". The "New Message Alert" form will be displayed.
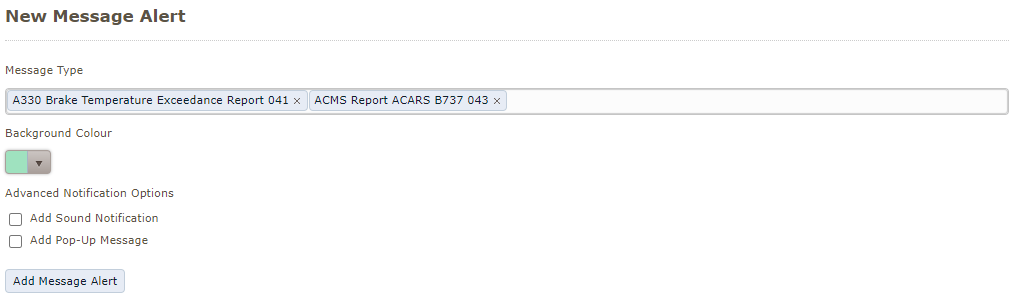
Select your message types from the dropdown along with the desired alert settings:
- Background colour
- Whether a sound should be played
- Whether a popup window should be shown
Click the "Add Message Alert" button to save your changes.
Edit/Remove My Alerts
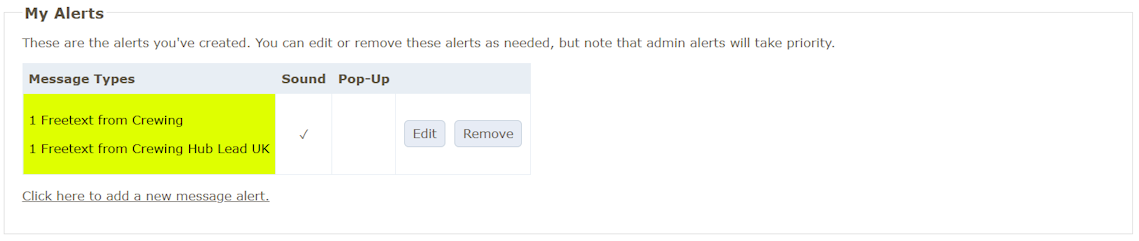
To edit a My Alert click the edit button.
To remove a My Alert click the remove button.
Add an Admin Alert
To add a new Admin Alert click the "Click here to add a new admin message alert". The "New Message Alert" form will be displayed.
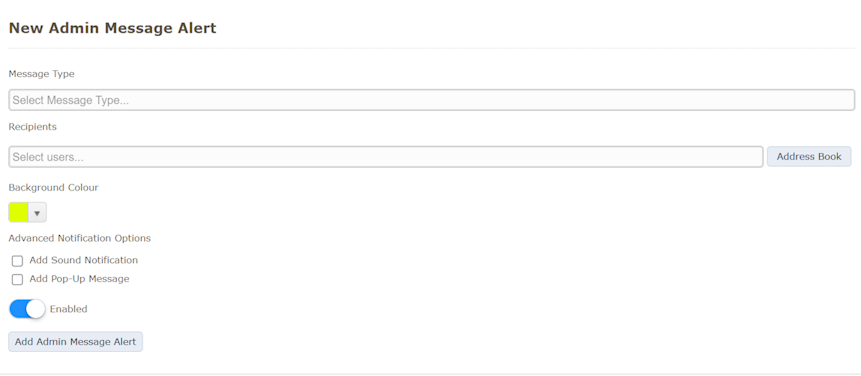
Select your message types from the dropdown along with the desired alert settings:
- Background colour
- Whether a sound should be played
- Whether a popup window should be shown
- Whether it is enabled
Click the "Add Admin Message Alert" button to save your changes.
Edit/Remove Admin Alerts
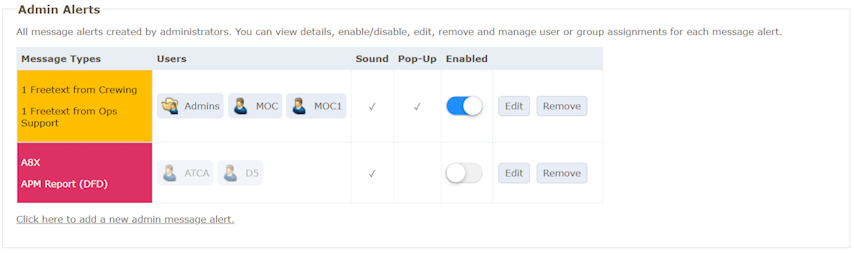
To edit a message alert click the edit button.
To remove a message alert click the remove button.
TopNew Message
This page allows the user to compose and send an uplink message. Click the 'New Message' button. The user is shown the New Message page where they can compose an uplink.
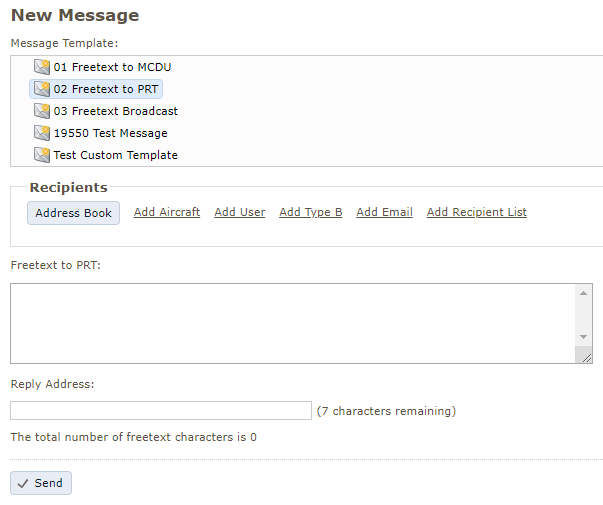
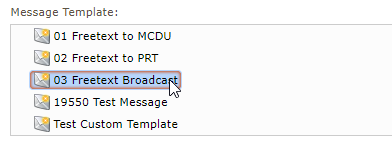
Select Uplink Message Template
A list of available uplink message templates is shown at the top of the page. Select an uplink message by clicking on the template name in the list.
Select Recipients
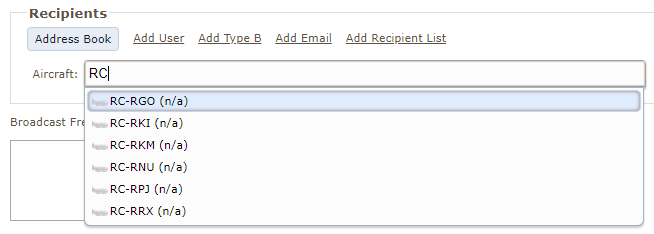
Depending on system configuration, there may be different types of recipient available for an uplink message. These may be entered directly or selected from the Address Book.
Enter Recipient Address
-
Display the address field for a recipient type by clicking one of the 'Add' links in the 'Recipients' section.

-
Enter the recipient addresses in the address field. Recipient lists, aircraft and users must match items shown in the drop-down list. Email and Type B addresses may be entered without restriction.
Select Recipients from Address Book
Display the Address Book by clicking on the 'Address Book' button. The Address Book will display tabs of available recipient types. Clicking on a recipient will automatically add it to the appropriate address field. The Address Book is closed by clicking the 'OK' button.

Complete and Send Message
-
Enter the fields required to send the message and click 'Send'.
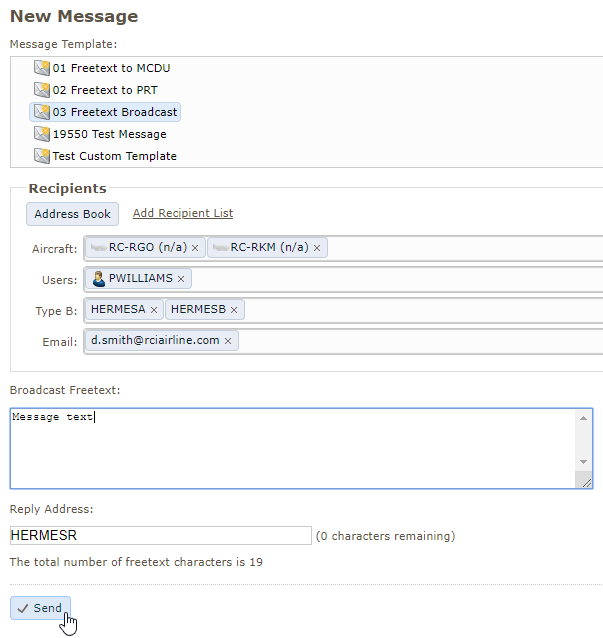
-
The user will be presented with a final 'Preview Message' page prior to sending.
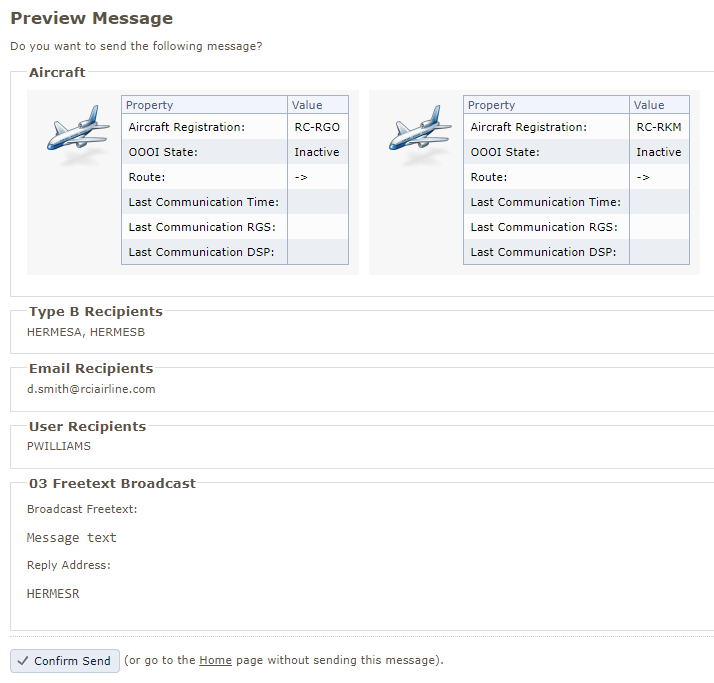
-
Click 'Confirm Send' to instruct the Hermes Server to attempt sending the message. The Hermes Web Messenger does not send uplinks; it relies on the Hermes Server to do so. Please refer to the Hermes Web Messenger Install and Configuration Guide for more information.
A user can navigate to another page if they no longer wish to send a message at any point during the New Message process.
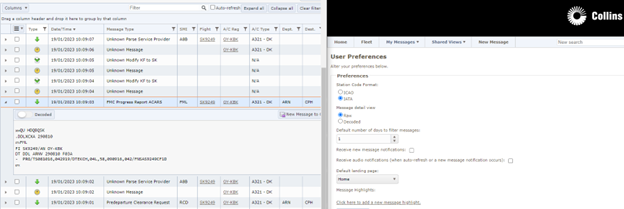
User Preferences
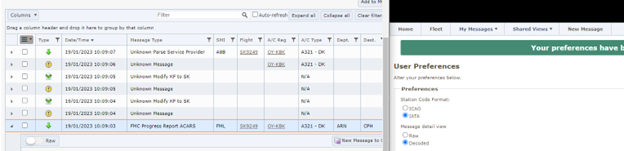
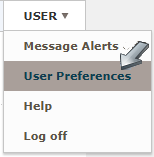
The Hermes Web Messenger provides some options to alter the display of data. These options are located in the user preferences page. To get to the user preferences page, a user must first be logged on to the Hermes Web Messenger. When logged in, the user preferences can be located by clicking their username as shown below.
Current options allow the user to:
-
Change the station code display format between IATA and ICAO .
-
Change the default number of days for the message filter.
-
Enable new message notifications - (see Notifications)
-
Enable audio notifications (if new message notifications are enabled). Note that audio notifications are dependent on the sound capability of the computer being used to access Hermes Web Messenger.
-
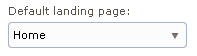
The landing page used when logging in, i.e. the page to return to, such as Downlinks or a Custom View.
Choose the desired options and click the 'Save Changes' button.
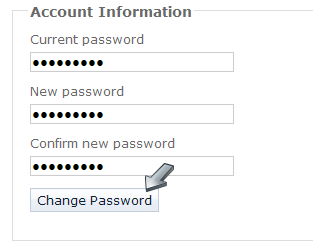
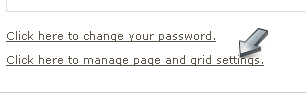
Changing Your Password
You may also change your password from the User Preferences page.
-
Click the hyperlink as shown below.

-
Enter your old password.
-
Enter a new password.
-
Confirm the new password.
-
Click the 'Change Password' button.
The Hermes Web Messenger will change your password and return you to the User Preferences page. Follow the on screen prompts to correct any errors that occur.
View Management
This page can be found in the User Preferences page and it allows a user to reset message pages and delete custom views.

Remove Custom Views
A view (or many views) may not be needed, e.g. if its filters are of no use or perhaps new views have been created from an initial custom view. Custom views can be removed here. To remove a page:
-
Select a view (or group, all custom pages) to remove.
-
Press the remove button. You will be prompted to remove any views selected.
Hermes Web Messenger will reset the selected views. The Hermes Web Messenger will also remove the selected views from the 'My Views' menu.
Reset Grid Settings
It is possible to reset a page's grid settings to the default settings here. A user may wish to do this if the grid cannot easily be reset by editing (it may have many filters applied or hidden columns, for example). To reset a page:
-
Select a view (or group, all pages) to reset.
-
Press the reset button. You will be prompted to reset the selected views.
Hermes Web Messenger will reset the selected views.
Legends
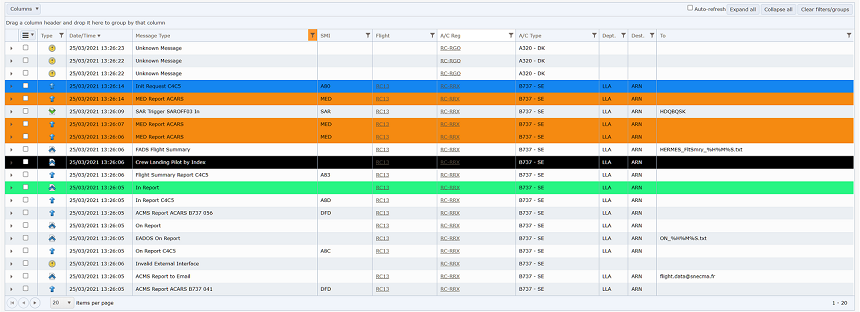
Message Icons
Hermes Web Messenger shows icons depending on message type. These are:
-
 Administrative
Event - a message warning Administrators of a potential issue.
Administrative
Event - a message warning Administrators of a potential issue.
-
 Downlink
- message received from an aircraft.
Downlink
- message received from an aircraft.
-
 Uplink
- a message sent to an aircraft.
Uplink
- a message sent to an aircraft.
-
 In -
a message received by The Hermes Server that is not a downlink, perhaps from a ground
system.
In -
a message received by The Hermes Server that is not a downlink, perhaps from a ground
system.
-
 Out
- an outgoing message to a ground system or Hermes user.
Out
- an outgoing message to a ground system or Hermes user.
Delivery status icons are shown below:
-
 In
Progress - message delivery is in progress.
In
Progress - message delivery is in progress.
-
 Retry
- message delivery is being retried.
Retry
- message delivery is being retried.
-
 Success
- message delivery was successful.
Success
- message delivery was successful.
-
 Error
- the message failed to be delivered.
Error
- the message failed to be delivered.
-
 Unknown
- The Hermes Server does not know the status of this message (none of the above).
Unknown
- The Hermes Server does not know the status of this message (none of the above).
Other message icons:
-
 Unread
message - indicates an unread message in 'My Messages'.
Unread
message - indicates an unread message in 'My Messages'.
-
 Read
message - indicates that an inbox, outbox or administrative event has been read.
Read
message - indicates that an inbox, outbox or administrative event has been read.
-
 Message
template folder
- uplink template folder, containing uplink templates.
Message
template folder
- uplink template folder, containing uplink templates.
-
 Message
template
- an uplink template.
Message
template
- an uplink template.
-
 Message
ownership
- allows ownership of a message.
Message
ownership
- allows ownership of a message.
Aircraft Icons
Hermes Web Messenger shows icons depending on aircraft status. These are:
-
 Inactive
Aircraft - the aircraft is currently inactive.
Inactive
Aircraft - the aircraft is currently inactive.
-
 Pre
or post flight
- the aircraft is in pre (or post) flight state (out, in or end of flight).
Pre
or post flight
- the aircraft is in pre (or post) flight state (out, in or end of flight).
-
 Pre
or post flight and sterile cockpit
- the aircraft is in pre (or post) flight state and is currently under sterile cockpit rules (icon only shown when sending a new Message).
Pre
or post flight and sterile cockpit
- the aircraft is in pre (or post) flight state and is currently under sterile cockpit rules (icon only shown when sending a new Message).
-
 In
flight
- the aircraft is in flight (off) state.
In
flight
- the aircraft is in flight (off) state.
-
 In flight and sterile cockpit
- the aircraft is in flight and is currently under sterile cockpit rules (icon only shown when sending a new Message).
In flight and sterile cockpit
- the aircraft is in flight and is currently under sterile cockpit rules (icon only shown when sending a new Message).
-
 Diversion
- the aircraft has been diverted.
Diversion
- the aircraft has been diverted.
-
 Incident
-
the aircraft is in incident state.
Incident
-
the aircraft is in incident state.
-
 Hijack
- the aircraft is in hijack state.
Hijack
- the aircraft is in hijack state.
Troubleshooting
Why do some grids display '(limited)'?
Sorting or grouping a large number of messages can take a long time; to aid performance in these situations the system administrator is able to set a maximum number of messages, matching the filter, that will be returned from the database before the sorting/grouping is applied. This does mean that some of the older matching messages may not be included. If any messages have been excluded "(limited)" will be displayed at the bottom of the grid, with a tooltip giving further details about the excluded messages. To avoid this limit you can:
- Change the date filter to a smaller date range (recommended option).
- Apply a more restrictive filter.
- Contact your system administrator to raise/disable the limit.
Why are certain messages not shown?
There are several reasons why messages may not be shown:
- Airline Associations - To see messages relating to a known aircraft a user must be associated with the airline that the aircraft belongs to. Messages that are not related to an aircraft, or that are related to an unknown aircraft, will be shown to all users unless an Aircraft filter is applied by the user (at which point they will be hidden even if the registration matches the filter).
- Message Permissions - To see messages a user must have been given the read permission for the Message Type.
- Filters - If a filter is applied the message may be hidden, this can be determined by checking the column filter icons.
Getting Further Help
Please contact your system administrator.
Top